An LLM Coding Agent in 6 incremental steps and about 140 lines of python
[Refer to LLM Agent in Five Steps for a shorter/simpler version of this tutorial that leverages the llm python module instead of LiteLLM]
Updates:
- 2025-05-06: more detail around tool calling and parameter inspection
- 2025-06-20: simplify litellm dependency install.
In this post I will show you how to create a working LLM coding agent in 6 incremental steps. We will use the python LiteLLM library and use Github Copilot which means all you need is a github account (in other words, no LLM API sign-up is needed to get started). The full code for each step shown below can be found at github.com/kanaka/litellm-agent.
Step 0: Prerequisites (uv, LiteLLM, etc)
You will either need a Github account (to access Github Copilot) or you will need LLM API keys with some billing credits. I recommend starting with the Github Copilot.
- Create a directory for your agent:
$ mkdir my-agent
$ cd my-agent- Install
uv(if you have not already) and then setup a virtual environment:
$ curl -LsSf https://astral.sh/uv/install.sh | sh
$ uv venv
$ source .venv/bin/activate- Install a branch of the LiteLLM project (into the venv) that has support for Github Copilot models.
$ uv pip install git+https://github.com/BerriAI/litellm.git@litellm_dev_03_05_2025_contributor_prsNote: in the examples that follow, user input that is typed into the agent is shown with a plum color.
We are now ready to start the fun!
Step 1: Single API call

First, we are going to make a single API "completion" call to our chosen LLM model and simply print the result. For this step, we will pass the first argument on the command line as the query that we want to send the LLM model.
#!/usr/bin/env python3

from litellm import completion
import sys

model = "github_copilot/o3-mini"
extra_headers = {"editor-version": "vscode/1.85.1"}

response = completion(
    model=model,
    extra_headers=extra_headers,
    messages=[{"content": sys.argv[1], "role":"user"}],
)

print(response.choices[0].message.content)
Now run your new "agent":
$ chmod +x agent.py

$ ./agent.py "In a single sentence, define the word 'agent'"
An agent is someone or something that acts on behalf of another person or entity, or that produces a specific effect.
We make a single call LLM model and provide it with a single "user"
message. We then extract the response message from the LLM and print
it. The LiteLLM completion function is based on OpenAPI defined API.
While other providers have similar APIs, they do have differences.
LiteLLM provides a common API that has the same input and output
format across all the providers.
Notes:
- The first time you run your agent with a Github Copilot model, you will be shown an 8 character code that you need to fill in at the provided github URL in order to authorize this client. Once you do this, API access token refreshes will happen automatically.
- With the Github Copilot free plan, you get 50 "premium requests" per
month. The code above uses "
github_copilot/o3-mini" because it is currently the least expensive model with excellent coding ability (at 0.33 premium requests per call). The "github_copilot/gemini-2.0-flash-001" model is slightly cheaper (at 0.25 per call) but my experience is that it has trouble using tools correctly. If you have paid plan then you can switch the model togithub_copilot/gpt-4to get unlimitedcompletioncalls. - The "editor-version" HTTP header is needed for now in order to use the "Github Copilot" functionality in the LiteLLM branch.
Step 2: Chat loop
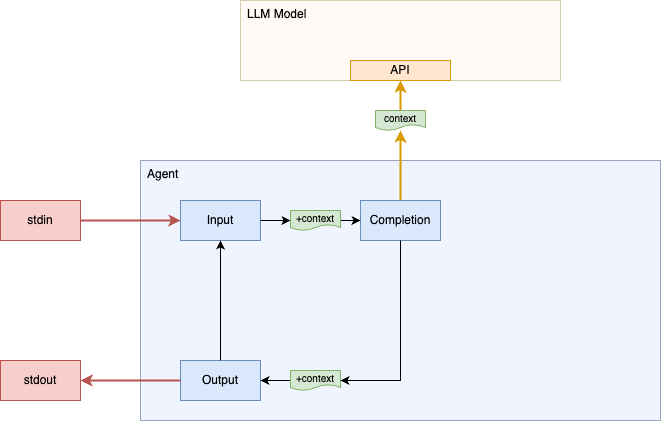
Our current implementation makes a single query, prints the response, and then exits. We don't have a way to "chat" with the model. LLM models via the API are essentially stateless. The client program has to provide all the state/context for each call.
Let's wrap the completion call and output in a loop. Prior to the loop
we initialize a messages list (context) with our initial system
prompt. The loop prompts for a user query, adds this to the context,
calls the completion API, and then adds the assistant (LLM model)
response to the messages list in addition to printing it out.
messages = [{"content": "You are a coding agent", "role":"system"}]

while True:
    try:
        user_input = input("user> ")
    except EOFError as e:
        break
    messages.append({"content": user_input, "role":"user"})

    response = completion(
        model=model,
        extra_headers=extra_headers,
        messages=messages,
    )

    resp_message = response.choices[0].message
    messages.append(resp_message.model_dump())

    print(f"assistant> {resp_message.content}")
Run our new version of the "agent" (user input is shown with a plum color):
$ ./agent.py
user> List five funny names for a Linux computer (without any explanation):
assistant> TuxTastic
KernelKicker
BashfulBot
PenguinPirate
SudoSultan
user> In a short sentence, explain why the fifth one is funny.
assistant> SudoSultan is funny because it blends the superuser command "sudo" with a regal title, humorously elevating its authority.
The second user query asks about the assistant's first response. A correct answer confirms that the context (messages list) is being accumulated correctly, otherwise the assistant would not be able to answer the followup.
Step 3: Tool calling
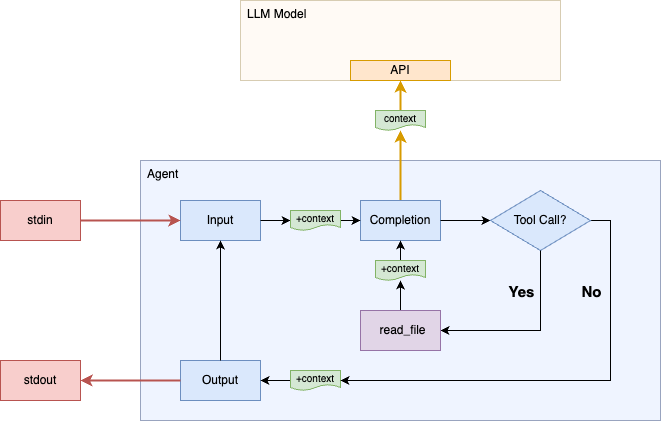
Our "agent" does not have much agency; it can't do anything unless it can convince the user to act on it's behalf. If I ask "Show me what's in file ./README.md.", the assistant will likely answer that it can't do that, but will give suggestions to the user for how to view the file themselves.
Let's take a step towards greater agency by defining a tool that the
assistant can invoke. First, create an API data structure
that defines tools in a format the assistant understands. The
following defines a single tool read_file that the assistant can
invoke:
import json
tools = [
    {
        "type": "function",
        "function": {
            "name": "read_file",
            "description": "Read the file at path. Returns a map {'content':content}",
            "parameters": {
                "type": "object",
                "properties": {
                    "path": {"type": "string"},
                },
                "required": ["path"]
            },
        },
    }
]
We pass this new tools structure in the completion call:
    response = completion(
        model=model,
        extra_headers=extra_headers,
        messages=messages,
        tools=tools,
    )
Let's add a trunc function for abbreviating long output messages
that we'll use in the next step:
def trunc(s, max=80):
    return s[:max-4] + '...' if len(s) >= max else s
If the assistant decides that it wants to call a tool, then the
response message will contain a populated tool_calls field. If this
field is set and the tool name is read_file, then we parse
the arguments (which are encoded as a JSON string), then we read the
file referred to in the path argument, and finally we append a tool
call response to the context (messages list). The response message
contains the original unique ID for this tool call and has a "content"
field that contains the JSON encoded result of the tool call. Replace
the assistant output message line as follows:
    tool_calls = resp_message.tool_calls
    if not tool_calls:
        print(f"assistant> {resp_message.content}")
        continue

    for tc in tool_calls:
        fn = tc['function']
        if fn.name == "read_file":
            fn_args = json.loads(fn.arguments)
            print(trunc(f"calling read_file({fn_args})"))
            fn_result = {"content": open(fn_args['path']).read()}
            res_str = json.dumps(fn_result)
            print(trunc(f"result: {res_str}"))
            messages.append({
                "role": "tool",
                "tool_call_id": tc['id'],
                "name": fn.name,
                "content": res_str,
            })
        else:
            raise Exception(f"Unknown tool call: {fn.name}")
There is one additional change that we need to make to the top of our loop. If the last message from the assistant is a tool call, then we should skip the user input/prompt and just send the tool call result that we added:
    if messages[-1]["role"] != "tool":
        try:
            user_input = input("user> ")
        except EOFError as e:
            break
        messages.append({"content": user_input, "role":"user"})
Run our new version of the "agent":
$ ./agent.py
user> What is the first line of file ./agent.py?
calling read_file({'path': './agent.py'})
result: {"content": "#!/usr/bin/env python3\n\nfrom litellm import completio...
assistant> The first line of the file is: #!/usr/bin/env python3
Step 4: Generic tools interface
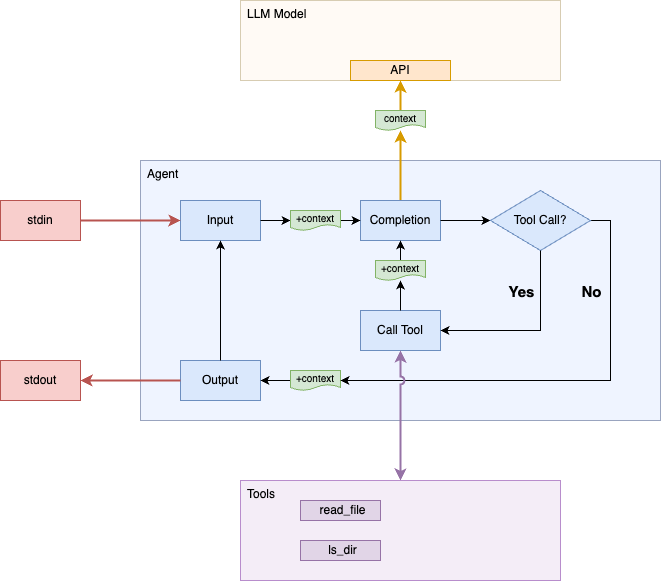
The current implementation uses a hard-coded definition for the
read_file tool that is passed to the completion API. Instead of
creating a new definition for each tool that we want to support, we
can use python's introspection to generate this definition from the
python functions themselves. The inspect.signature function returns
detailed information about each parameter of a python function. We use
this information to construct the map of parameter map needed for the
completion call.
Define a function that that takes a map of tools names to functions
and returns the tools value needed for the completion API:
import inspect

def get_tools_param(tools_map):
    typemap = {int: "integer", float: "number", bool: "boolean"}
    tools = []
    for name, fn in tools_map.items():
        props, req = {}, []
        for p in inspect.signature(fn).parameters.values():
            if p.kind.name.startswith("VAR"):  # skip *args/**kw
                continue
            props[p.name] = {"type": typemap.get(p.annotation, "string")}
            if p.default is p.empty:
                req.append(p.name)
        tools.append({
            "type": "function",
            "function": {
                "name": name,
                "description": (fn.__doc__ or "").strip(),
                "parameters": {
                    "type": "object",
                    "properties": props,
                    **({"required": req} if req else {})
                }
            }
        })
    return tools
Then define the tool functions with a sufficient docstring and result format that makes it clear to the assistant how the tools should be used:
def read_file(path):
    """Read the file at path.
    Returns a map {'content':content} (raw file string in content)"""
    return {"content": open(path).read()}

import subprocess

def ls_dir(path):
    """Runs `ls -la path` to list files in the current directory.
    Returns a map {'stdout':stdout,'stderr':stderr,'returncode':code}"""
    cp = subprocess.run(["ls", "-la", path], capture_output=True, text=True)
    res = {k: getattr(cp, k) for k in ('stdout', 'stderr', 'returncode')}
    return res
Remove the global tools variable and add a new tools map (after the
tool functions) that enumerates the available tools including the new
ls_dir tool/function.
TOOLS_MAP = {
    "read_file": read_file,
    "ls_dir": ls_dir,
}
Prior to our main loop use the get_tools_param function to
initialize the tools value that is passed to the completion call:
tools = get_tools_param(TOOLS_MAP)Finally, adjust the tool calling loop to use a more generic mechanism
for calling the tools defined in the TOOLS_MAP:
    for tc in tool_calls:
        fn = tc['function']
        if fn.name in TOOLS_MAP:
            fn_args = json.loads(fn.arguments)
            print(trunc(f"calling {fn.name}({fn_args})"))
            fn_result = TOOLS_MAP[fn.name](**fn_args)
            ...
Let's try it out:
$ ./agent.py
user> Summarize the functionality of the python file in this dir in one sentence.
calling ls_dir({'path': '.'})
result: {"stdout": "total 16\ndrwxrwxr-x@  7 joelmartin  staff   224 May  2 ...
calling read_file({'path': './agent.py'})
result: {"content": "#!/usr/bin/env python3\n\nfrom litellm import completio...
assistant> This Python script implements an interactive command-line coding agent that leverages a language model to process user inputs and execute defined filesystem tools (such as reading files and listing directory contents) based on dynamically generated tool calls.
Step 5: File editing tools
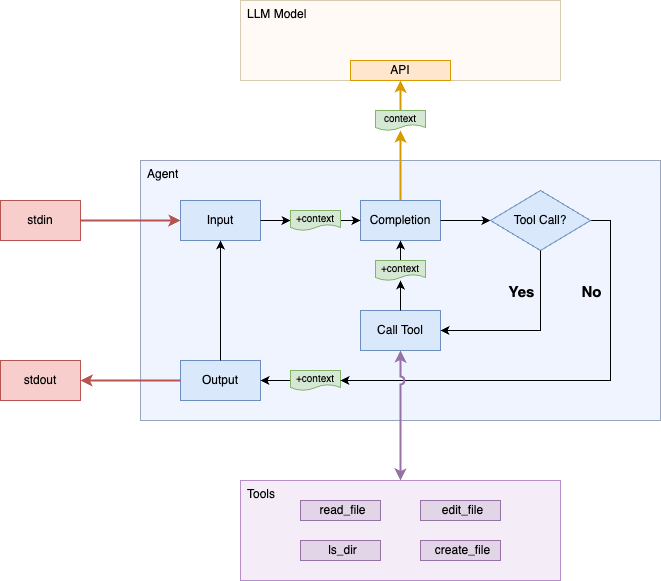
Our agent has the ability to list and read files, now let's make the final improvement that will actually turn this into a coding agent.
Define the functions that will allow the agent to edit and
create new files and add them to the TOOLS_MAP:
def edit_file(path, match, replace):
    """Edit the file at 'path' replacing the first occurence of
    'match' string with 'replace' string. 'match' and 'replace' are
    raw strings and should not have escaped newlines, backslashes, etc.
    Returns an empty map on success"""
    orig = open(path).read()
    new = orig.replace(match, replace, 1)
    if new == orig: raise Exception("match string not found")
    open(path, "w").write(new)
    return {}

def create_file(path, content):
    """Create (or replace) file at 'path' with 'content'.
    'content' is a raw string and does not need extra escaping.
    Returns an empty map on success"""
    open(path, "w").write(content)
    return {}

TOOLS_MAP = {
    "read_file": read_file,
    "ls_dir": ls_dir,
    "edit_file": edit_file,
    "create_file": create_file,
}
Those new tools enable a large amount of agentic coding ability. Let's improve the error handling and format of the tool calling messages:
            print(trunc(f"tool call> {fn.name}({fn_args})"))
            try:
                fn_result = TOOLS_MAP[fn.name](**fn_args)
            except Exception as e:
                fn_result = {"error": str(e)}
            res_str = json.dumps(fn_result)
            print(trunc(f"tool result> {res_str}"))
            message.append({
                ...
Now let's use the new editing ability to make changes to a file:
$ echo 'hello NAME!' > greet.txt

$ ./agent.py
user> Change the greeting in the text file to use my first name.
assistant> Could you please clarify two things for me?
1. What is the path or name of the text file you're referring to?
2. What is your first name that you would like to use in the greeting?
user> My name is Joel. You find the file.
tool call> ls_dir({'path': '.'})
tool result> {"stdout": "total 16\ndrwxrwxr-x@  7 joelmartin  staff   224 Ma...
tool call> read_file({'path': 'greet.txt'})
tool result> {"content": "hello NAME!\n"}
tool call> edit_file({'match': 'NAME', 'replace': 'Joel', 'path': 'greet.txt'})
tool result> {}
assistant> The greeting in greet.txt has been updated to "hello Joel!"
Note that sometimes the model will not ask the clarifying questions
and will use the result of ls_dir to guess the first name based on
directory/file ownership.
Step 6: Final touch ups
Those four simple tools/abilities (list files, read a file, create a file, and edit a file) are enough to give our agent the ability to do coding tasks. So let's use our agent itself to make some final improvements to its own code.
$ ./agent.py
user> Copy agent.py to agent2.py where we will make changes. Start by adding a friendly startup message (with model).
tool call> read_file({'path': 'agent.py'})
tool result> {"content": "#!/usr/bin/env python3\n\nfrom litellm import comp...
tool call> create_file({'content': '#!/usr/bin/env python3\n\nfrom litellm i...
tool result> {}
assistant> I've created agent2.py with a friendly startup message that prints the model being used.
user> For the three prints and the input call, colorize the part before the '>' using ASCII escape codes (red, green, blue, purple).
tool call> create_file({'content': '#!/usr/bin/env python3\n\nfrom litellm i...
tool result> {}
assistant> I've updated agent2.py to colorize the prompt and prints. Red is now used for the user input, green for tool call, blue for tool result, and purple for assistant's plain output.
user> Before calling a tool, confirm with the user. If confirmed continue as before, otherwise add a response map to the messages with a "User Refused" error.
tool call> create_file({'content': '#!/usr/bin/env python3\n\nfrom litellm i...
tool result> {}
assistant> I've updated agent2.py to prompt the user for confirmation before calling any tool. If you enter anything other than 'y', the tool call will be skipped and an error message ("User Refused") will be added to the messages.
Now test the agent driven code changes:
$ chmod +x agent2.py

$ ./agent2.py
Welcome! Starting agent with model: github_copilot/o3-mini
user> What is in ./greet.txt?
Confirm calling tool 'read_file' with arguments {'path': './greet.txt'}? (y/N)> y
tool call> read_file({'path': './greet.txt'})
tool result> {"content": "hello Joel!\n"}
assistant> The content of "./greet.txt" is:
hello Joel!
The full code for each of the above steps can be found at github.com/kanaka/litellm-agent.
Step 7: You take it from here!
You now have a basic working coding agent. The next steps are up to you. Here are some ideas:
- Add streaming output so that you can see the progress of the model as it is generating longer responses.
- Make the tool confirmation more sophisticated and allow specific actions or whole tools to be run without confirmation the next time.
- Add proper python argument parsing. Allow the model name, system prompt, tool confirmation mode, etc to be specified as command line. Allow the initial query to optionally be specified on the command line (like step 1).
- Add the ability to continue a previous session (save/pickle the context and reload it if requested).
- Give it the ability to run tests.
- Get it working reliably with other models. For example,
github_copilot/gemini-2.0-flash-001is the cheapest model but it has trouble using the tools the way they are currently defined.