A new LLM Coding Agent in 5 incremental steps and less than 80 lines of python
Updates:
- 2025-06-16: add Github Copilot authentication command to prerequisites
- 2025-06-20: example of output from Github Copilot device auth flow
In this post I will show you how to create a working LLM coding agent in 5 incremental steps. We will use Simon Willison's llm library and John Daly's llm-github-copilot plugin. The plugin gives us access to LLM models via Github Copilot which means all you need to get started is a github account (no LLM API sign-up/credit card required).
This is very similar to a previous previous post An LLM Coding Agent in 6 incremental steps and about 140 lines of python. The key difference is the use of llm instead of LiteLLM. The resulting agent is much more concise and hopefully easier to understand.
Step 0: Prerequisites (uv, llm, etc)
You will either need a Github account (to access Github Copilot) or you will need LLM API keys with some billing credits. I recommend starting with the Github Copilot.
- Create a directory for your agent:
$ mkdir my-agent
$ cd my-agent- Install
uv(if you have not already) and then setup a python virtual environment:
$ curl -LsSf https://astral.sh/uv/install.sh | sh
$ uv venv
$ source .venv/bin/activate- Install versions of llm and the llm-github-copilot plugin that have sufficient tool calling support.
$ uv pip install "git+https://github.com/simonw/llm.git"
$ uv pip install "git+https://github.com/jmdaly/llm-github-copilot.git@refs/pull/18/head#egg=llm_github_copilot"- Authenticate with Github Copilot. You will be shown an 8 character code that you need to fill in at the provided github URL in order to authorize this client. Once you do this, API access token refreshes will happen automatically.
$ llm github_copilot auth login
Starting GitHub Copilot login process to obtain an access_token & API key...
Fetching API key...

Please visit https://github.com/login/device and enter code 1234-ABCD to authenticate GitHub Copilot.

Waiting for authorization... (attempt 1/12)
...
Authentication successful!
We are now ready to start the fun!
Notes:
- The full code for each of the steps can be found at github.com/kanaka/llm-agent.
- In the examples that follow, user input that is typed into the agent is shown with a plum color.
Step 1: Single API call
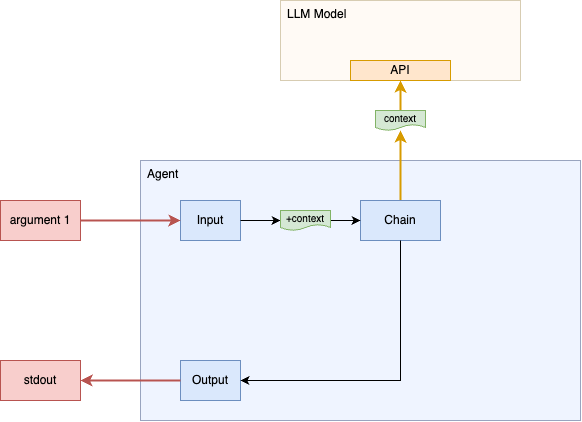
First, we are going to make a single API prompt call to our chosen LLM model and simply print the result. For this step, we will pass the first argument on the command line as the prompt that we want to send the LLM model.
#!/usr/bin/env python3

import llm
import sys
DEFAULT_MODEL = "github_copilot/o3-mini"

model = llm.get_model(DEFAULT_MODEL)
response = model.prompt(sys.argv[1])
print(response.text())
Now run your new "agent":
$ chmod +x agent.py

$ ./agent.py "In a single sentence, define the word 'agent'"
An agent is someone or something that acts on behalf of another person or entity, or that produces a specific effect.
We make a single call LLM model and provide it with a single "user" message. We then print the response message from the LLM.
Notes:
- With the Github Copilot free plan, you get 50 "premium requests" per
month. The code above uses "
github_copilot/o3-mini" because it is currently the least expensive model with excellent coding ability (at 0.33 premium requests per call). The "github_copilot/gemini-2.0-flash-001" model is slightly cheaper (at 0.25 per call) but does not have full tool calling support via Github Copilot. If you have paid plan then you can switch the model togithub_copilot/gpt-4.1to get unlimitedcompletioncalls. - Refer to llm prompt API documentation
Step 2: Chat loop
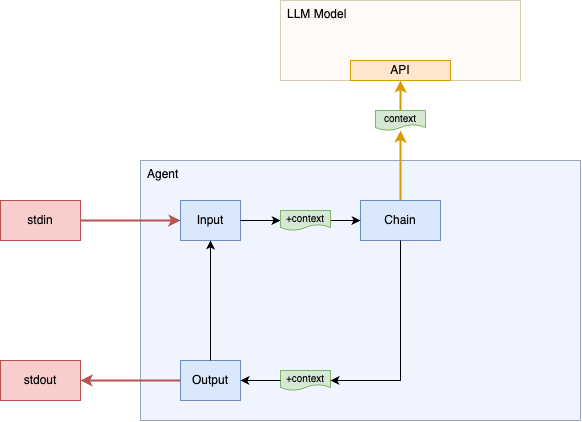
Our current implementation makes a single query, prints the response, and then exits. We don't have a way to "chat" with the model. LLM models via their direct APIs are essentially stateless. The client has to provide all the state/context for each call. The llm library provides a conversation object that will accumlate this state for us.
Let's construct a conversation instance and then wrap its prompt calls
in a loop. The loop prompts for a user prompt, calls the
conversation.prompt API with the user prompt, and then prints the
response.
#!/usr/bin/env python3

import llm
DEFAULT_MODEL = "github_copilot/o3-mini"

# Conversation setup

model = llm.get_model(DEFAULT_MODEL)
conversation = model.conversation()

while True:
    try:
        user_input = input("user> ")
    except EOFError as e:
        break

    response = conversation.prompt(user_input)
    print(f"assistant> {response.text()}")
Run our new version of the "agent" (user input is shown with a plum color):
$ ./agent.py
user> List five funny names for a Linux computer (without any explanation):
assistant> TuxTastic
KernelKicker
BashfulBot
PenguinPirate
SudoSultan
user> In a short sentence, explain why the fifth one is funny.
assistant> SudoSultan is funny because it blends the superuser command "sudo" with a regal title, humorously elevating its authority.
The second user query asks about the assistant's first response. A correct answer confirms that the context (previous user and assistant messages) is being accumulated correctly, otherwise the assistant would be unable to answer the followup question.
Step 3: Tool calling
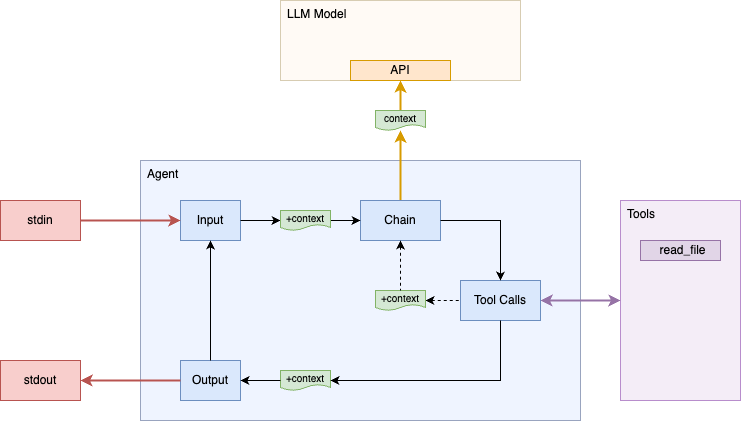
Our "agent" does not have much agency; it can't do anything unless it can convince the user to act on it's behalf. If I ask "Show me what's in file ./README.md.", the assistant will likely answer that it can't do that, but will give suggestions to the user for how to view the file themselves.
Let's take a step towards greater agency by defining a tool that the
assistant can invoke. Define a function read_file that the
assistant can invoke and add it to a tools list:
# Tool definitions

def read_file(path: str):
    "Read the file at path. Returns a map {'content':content}"
    return {"content": open(path).read()}

tools = [read_file]
Let's also define some debug functions for concisely showing tool calls and responses and then pass the tools
def trunc(s, max=80):
    return s[:max-4] + '...' if len(s) >= max else s

def before_call(tool, tool_call):
    print(trunc(f"tool call> {tool.name}({tool_call.arguments})"))

def after_call(tool, tool_call, tool_result):
    print(trunc(f"tool result> {tool_result.output}"))
We need to include the tools list and debug functions when we instantiate our conversation instance:
model = llm.get_model(DEFAULT_MODEL)
conversation = model.conversation(
    tools=tools,
    before_call=before_call,
    after_call=after_call,
)
Finally, in our loop, we use the conversation.chain method instead
of the prompt method.
response = conversation.chain(user_input)The chain method will will automatically
detect when the assistant returns a response containing a tool call.
It will then run that tool and send the result of the tool to the
assistant. All tool calls are resolved before the chain method
returns with the final assistant response.
Run our new version of the "agent":
$ ./agent.py
user> List the imports in ./agent.py
tool call> read_file({'path': './agent.py'})
tool result> {"content": "#!/usr/bin/env python3\n\nimport llm\nDEFAULT_MODE...
assistant> The file contains a single import:

import llm
Notes:
- Refer to llm conversation API documentation
Step 4: File editing tools
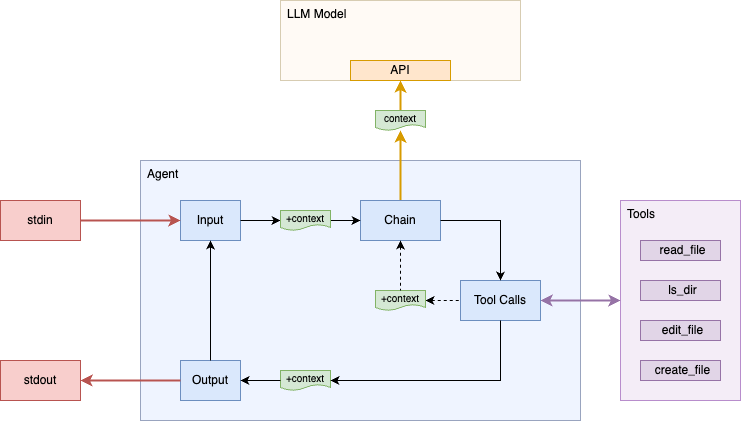
Our agent has the ability to read files, now let's make the final small change that will turn it into a true coding agent. All that is need is a few more functions that give it the ability to list files, edit files, and create files.
import subprocess

def ls_dir(path):
    """Runs `ls -la path` to list files in the current directory.
    Returns a map {'stdout':stdout,'stderr':stderr,'returncode':code}"""
    cp = subprocess.run(["ls", "-la", path], capture_output=True, text=True)
    res = {k: getattr(cp, k) for k in ('stdout', 'stderr', 'returncode')}
    return res

def edit_file(path, match, replace):
    """Edit the file at 'path' replacing the first occurence of
    'match' string with 'replace' string. 'match' and 'replace' are
    raw strings and should not have escaped newlines, backslashes, etc.
    Returns an empty map on success"""
    orig = open(path).read()
    new = orig.replace(match, replace, 1)
    if new == orig: raise Exception("match string not found")
    open(path, "w").write(new)
    return {}

def create_file(path, content):
    """Create (or replace) file at 'path' with 'content'.
    'content' is a raw string and does not need extra escaping.
    Returns an empty map on success"""
    open(path, "w").write(content)
    return {}

tools = [read_file, ls_dir, edit_file, create_file]
Now let's use the new editing ability to make changes to a file:
$ echo 'hello NAME!' > greet.txt

$ ./agent.py
user> Change the greeting in the text file to use my first name.
assistant> I need a bit more information before proceeding. Could you please tell me the file name (or path) of the text file you want to change, and also provide your first name that should be used in the greeting?
user> My name is Joel. You find the file.
tool call> ls_dir({'path': '.'})
tool result> {"stdout": "total 20\ndrwxrwxr-x  3 joelmartin joelmartin 4096 ...
tool call> read_file({'path': 'greet.txt'})
tool result> {"content": "hello NAME!\n"}
tool call> edit_file({'match': 'NAME', 'path': 'greet.txt', 'replace': 'Joel'})
tool result> {}
assistant> I've updated greet.txt so that the greeting now reads "hello Joel!" Let me know if you need any further changes.
Note that sometimes the model will not ask the clarifying questions
and will use the result of ls_dir to guess the first name based on
directory/file ownership.
Step 5: Final changes (and a sprinkle of inception)
Those four simple tools/abilities (list files, read a file, edit a file, and create a file) are enough to give our agent the ability to do coding tasks. So let's use our agent itself to make some final improvements to its own code.
$ ./agent.py
user> Copy agent.py to agent2.py where we will make changes. Use correct python indenting for all future changes.
tool call> read_file({'path': 'agent.py'})
tool result> {"content": "#!/usr/bin/env python3\n\nimport llm\nDEFAULT_MODE...
tool call> create_file({'content': '#!/usr/bin/env python3\n\nimport llm\nDE...
tool result> {}
assistant> agent2.py has been created with the same content as agent.py. Let me know what changes you'd like to make next.
user> Add a friendly startup message showing the model.
tool call> edit_file({'match': ')\n\nwhile True:', 'path': 'agent2.py', 'rep...
tool result> {}
assistant> I've inserted a friendly startup message that displays the model in agent2.py. Let me know if you need any other modifications.
user> For the three prints and the input call, colorize the part before the '>' using ASCII escape codes (red, green, blue, purple).
tool call> edit_file({'match': 'input("user> "', 'path': 'agent2.py', 'repla...
tool result> {}
tool call> edit_file({'match': 'tool call>', 'path': 'agent2.py', 'replace':...
tool result> {}
tool call> edit_file({'match': 'tool result>', 'path': 'agent2.py', 'replace...
tool result> {}
tool call> edit_file({'match': 'assistant>', 'path': 'agent2.py', 'replace':...
tool result> {}
assistant> I've updated agent2.py to colorize the parts before the '>' using the specified ASCII escape codes:
- The input prompt now colors "user" in red,
- The "tool call>" prefix is colored in green,
- The "tool result>" prefix is colored in blue,
- The "assistant>" prefix is colored in purple.

Let me know if there are any further changes you'd like to apply!
user> Before calling a tool, confirm with the user. If confirmed continue as before, otherwise raise a llm.CancelToolCall exception with a "User Refused" message.
tool call> edit_file({'match': 'print(trunc(f"\\033[32mtool call\\033[0m> {t...
tool result> {}
assistant> I've updated the agent2.py before_call function to confirm with the user before calling a tool. The tool call will now prompt the user with "Proceed with tool call? (y/n)" and raise a llm.CancelToolCall exception if the user does not confirm.

Let me know if additional modifications are needed!
Now review the code changes and then test our agent modified agent:
$ diff -urp agent.py agent2.py
...

$ chmod +x agent2.py

$ ./agent2.py
Agent started with model: github_copilot/o3-mini
user> What is in ./greet.txt?
tool call> read_file({'path': './greet.txt'})
Proceed with tool call? (y/n) y
tool result> {"content": "hello Joel!\n"}
assistant> The file contains: "hello Joel!" followed by a newline.
Notes:
- The full code for each of the steps can be found at github.com/kanaka/llm-agent.
Step 6: You take it from here!
You now have a basic working coding agent. The next steps are up to you. Here are some ideas:
- Add streaming output so that you can see the progress of the model as it is generating longer responses.
- Make the tool confirmation more sophisticated and allow specific actions or whole tools to be run without confirmation the next time.
- Add proper python argument parsing. Allow the model name, system prompt, tool confirmation mode, etc to be specified as command line. Allow the initial query to optionally be specified on the command line (like step 1).
- Give it the ability to run tests.